Maximize Notion's Power: Tagging & Filtering Guide
One of the most powerful features of Notion is the ability to apply flexible tags to entries in a Notion database. Once you have added tags to your Notion database records, you will then be able to create different views and filter/sort the display options based on your existing tags. Adding tags to your Notion database entries is the first step towards unlocking the advanced features of Notion.
What are tags in Notion
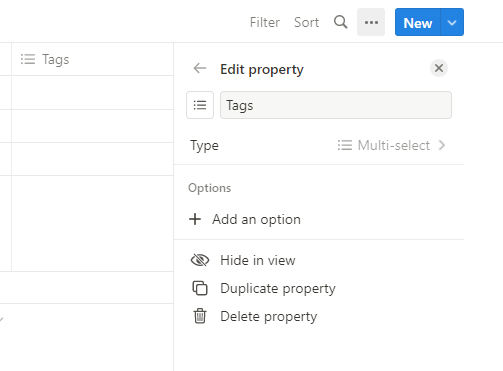
Tags are basically labels that you can apply to Notion database entries in certain types of Notion properties, namely Select, Multi-select and Status property. You can create new tags by click on the property heading and select “Edit Property”.

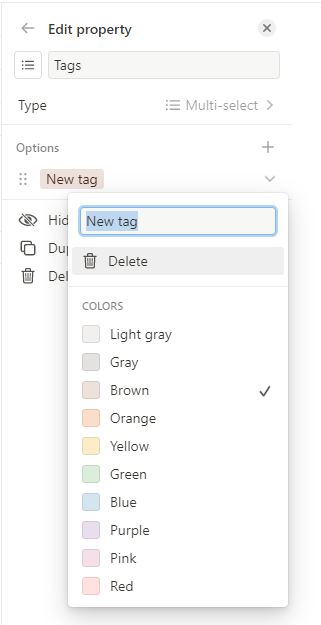
Then, in the side panel, under “Options”, choose “+ Add an option”.
Enter a new name for this tag option and hit “Enter”. Now, a new option has been created and is assigned a default colour. If you click on the newly created option, you will be able to edit and modify the colour associated with this option. This is not a critical step in making full use of the tagging feature of Notion but it does help to visually differentiate certain categories and processes.
How to add tags to Notion database entries
There are three types of Notion database properties (or columns) that allow you to implement tagging in Notion - Select, Multi-select and Status property.
Select and Multi-select properties have more flexibility in terms of the types of tags you can create. All tag values are completely user defined. You can create a tag named “Todo”, “Urgent” or “Follow Up” for each of the Select and Multi-select columns. But the difference between Select and Multi-select is that you can only choose 0 or 1 tag for each row or entry in your Notion database for Select, while you can choose many tags for Multi-select.

If you are using a Notion database to manage tasks that have different stages or statuses in a workflow, then you might consider using the Status property. You can create user defined status values in the Status property under three categories: “To-do”, “In-Progress” or “Complete”. All statuses created by you will fall into one of these three categories. So the Status property is slightly less flexible compared to Select and Multi-select.
| Notion Property Type | Flexibility | Allow multiple tags? |
|---|---|---|
Select |
Medium | No |
Multi-select |
High | Yes |
Status |
Low | No |
Notion database property options comparison for tagging.
Automated Notion database tagging for saved emails
If you are looking for an integration not only to save emails to Notion but also to tag them without logging into Notion, then TaskRobin is the one for you.
In this simple guide, we will take a look at how you can use TaskRobin’s robot inboxes to automatically tag and save emails to Notion without ever leaving your Gmail, Outlook, or any other email provider’s web page.
If you are not yet familiar with TaskRobin, TaskRobin is an integration tool to help you seamlessly save emails to Notion and manage them as tasks. And it goes without saying that an important feature would be to tag the emails as you are saving them to Notion and make use of all the great customisation options to improve your productivity.
So how do you tag and save emails to Notion?
You have to first set up your TaskRobin account and connect your Notion pages. Then, in order to save emails to Notion, you will need to send/BCC/auto forward emails to a TaskRobin robot inbox of your choice, such as notion@taskrobin.io.
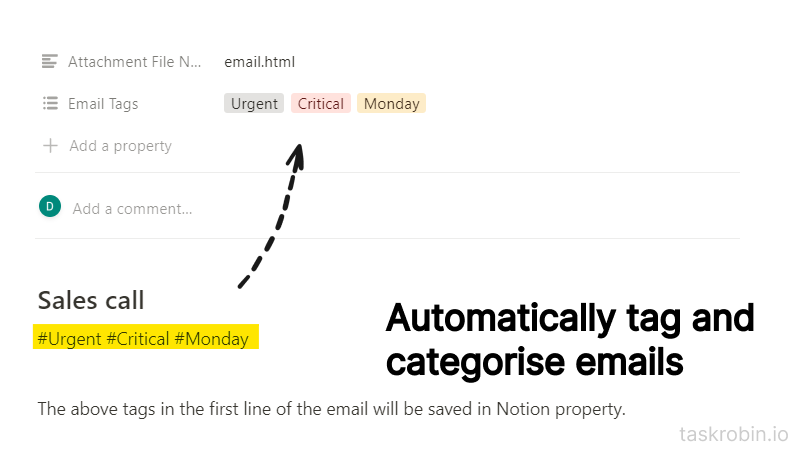
To tag an email while saving them, add a hashtag on the first line of the email message body as you send or BCC them to your TaskRobin robot inbox. A tag will be automatically created for you and show up in the “Email Tag” property in Notion for your corresponding email item.
It’s that simple!
Create and auto fill tags in your custom properties
If you need to automatically apply a tag to all your saved emails, then TaskRobin’s auto fill rules can preset and fill in those properties with the values you defined whenever a new email is saved.
You can create an auto fill rule on one of your select or multi-select properties with a tag value such as “New” or “Todo”, and all emails that you save via TaskRobin will create Notion items in your database with those tags applied automatically.
Create database views with filtering on tags
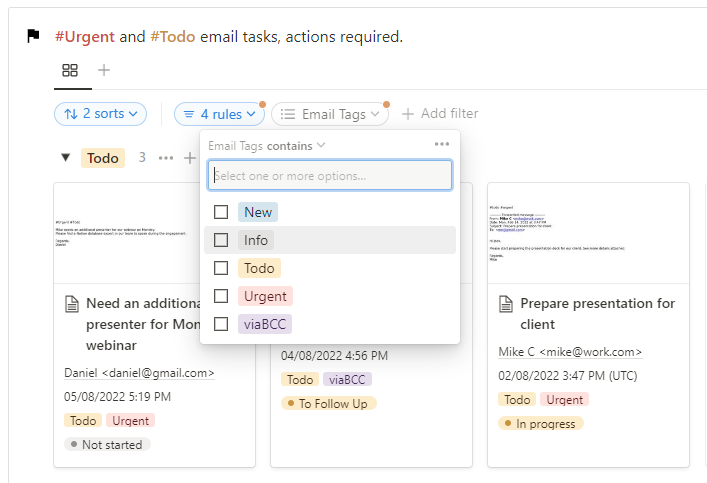
Now that your Notion data is tagged, you can start creating Notion views to display only a subset of your database entries. When it comes to filtering based on tags, Notion allows you to create database views to logically filter based on if the record ‘contains’, ‘does not contain’, ‘is empty’, ‘is not empty’ for a particular tag column.
You are also given the option to select which tags you want to apply the logical rules to.
Once you have mastered using tags with Notion database entries and views, you unlock a whole different world of dashboard building with Notion. Feel free to experiment and find out what is your preference for the different tagging property column choices, and keep iterating on your dashboard to improve your workflow!