How to Automatically Save Incoming Outlook Emails to Notion
Looking for solutions to auto-forward and save emails from Gmail? Read more here.
Notion is one of the most versatile productivity and task management tools, known for its flexibility and customization options. But, there’s one key feature Notion lacks—the ability to save emails directly to your Notion database.
This is where TaskRobin comes in. TaskRobin is a seamless email-to-Notion integration that allows you to automatically forward your Outlook emails to a Notion database—complete with attachments, email metadata (sender, subject, timestamps, etc.), and HTML content. Once set up, you’ll never have to dig through your inbox for attachments again. Everything will be saved to Notion for easy task management.

Why Automate Saving Outlook Emails to Notion?
Automation is a game-changer for busy professionals. Imagine automatically saving purchase confirmations, client communications, and important newsletters into Notion, where you can manage them as tasks. With TaskRobin, you can set rules to forward specific emails based on senders, keywords, or subjects, making your workflow more efficient and organized.
In this article, we’ll walk you through how to set up Outlook email rules to automatically forward emails to Notion via TaskRobin.
Step 1: Set Up TaskRobin and Link Your Notion Database
Before configuring Outlook, sign up for a TaskRobin trial and link your Notion database to your TaskRobin account. Follow the on-screen steps, and if you need help, watch our step-by-step video guide.
Once linked, you’ll see your Notion database in the “Integrations” tab on your TaskRobin dashboard. A private TaskRobin forwarding address (e.g., emails@taskrobin.io) will be created automatically. This inbox will be used to forward emails to your Notion database.
Step 2: Configure Outlook to Auto-Forward Emails to TaskRobin
Now, let’s set up Outlook to automatically forward emails to TaskRobin and save them in Notion.
Step-by-Step Guide:
-
Open Outlook Web Settings:
On the Outlook web version, click the gear icon at the top right to open the Settings panel. -
View All Settings:
Scroll down and click “View all Outlook settings” to open a pop-up with additional options. -
Navigate to Forwarding Settings:
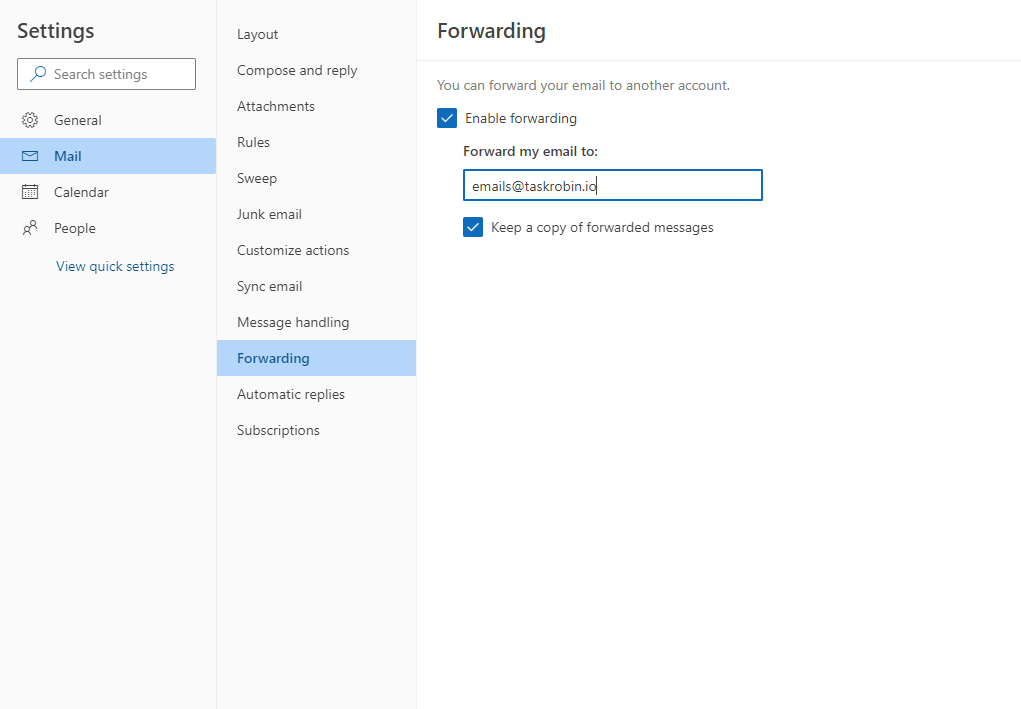
In the pop-up, go to Mail → Forwarding
(For the Classic web version: Mail → Accounts → Forwarding) -
Enable Forwarding:
Select Enable Forwarding and enter your TaskRobin forwarding address email (e.g.,emails@taskrobin.io). Click Save.
- (In the Classic version, this option is called “Start forwarding”)
-
Optional: Keep a Copy in Outlook:
Check the box to “Keep a copy of forwarded messages” if you want to retain copies of the emails in your Outlook inbox. If not, all incoming emails will be forwarded to TaskRobin and won’t appear in your Outlook inbox.
Advanced Tip: Set Specific Rules for Email Forwarding
If you want to forward only certain emails—such as those from specific senders or emails containing keywords—create advanced Outlook email rules. These rules allow you to auto-forward emails to different Notion databases based on your criteria.
Troubleshooting: “Your Organization Does Not Allow External Forwarding” Error
If you encounter an error stating “Your organization does not allow external forwarding”, this means your admin has blocked external forwarding. As an Outlook administrator, you’ll need to enable this feature.
Here’s a Microsoft 365 guide that explains how to allow external email forwarding by updating admin settings.
Conclusion: Supercharge Your Email Management with TaskRobin
That’s it! You’ve successfully set up Outlook to automatically forward emails to TaskRobin, where they’ll be saved and organized in your Notion workspace. With TaskRobin, you can now streamline email-to-task workflows and keep your inbox and Notion in sync.
Looking to fine-tune your email automation? Dive into Outlook rules to create custom forwarding actions for specific emails, based on sender, keywords, or content.
Start using TaskRobin today to simplify your email management in Notion!